
When I want to search for something I can see but struggle to describe, I start with a picture. A lamp with an unusual shape or a label in another language gives me a better starting point than a vague search phrase.
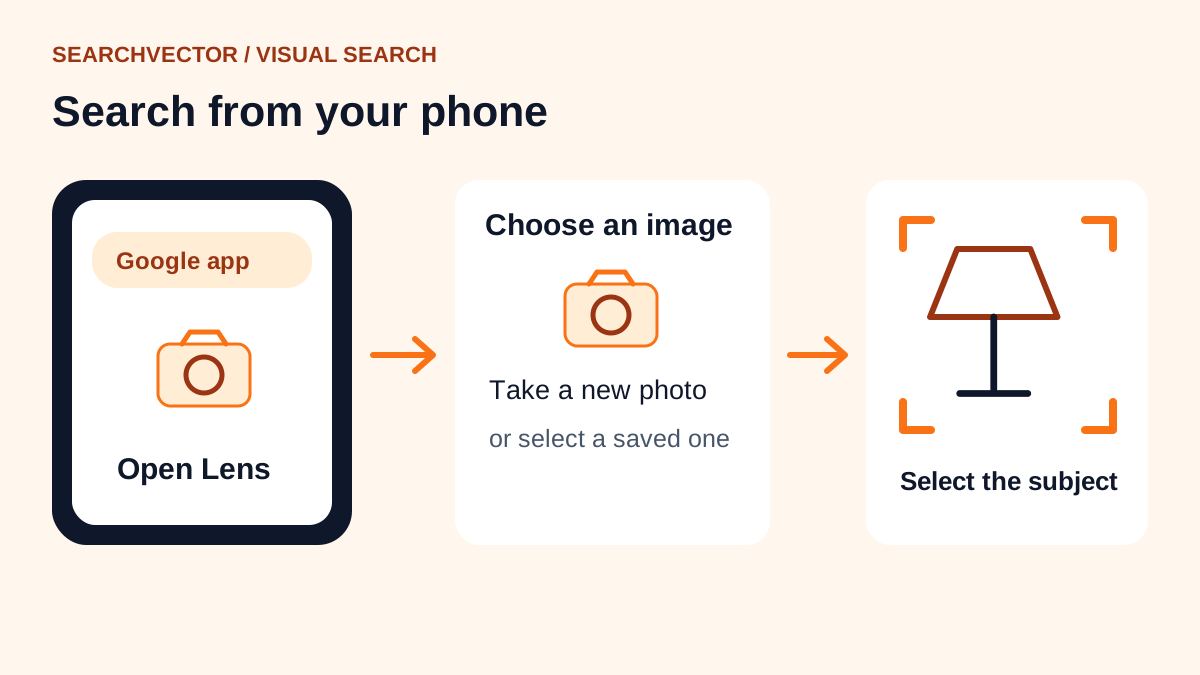
Here is the quickest way to use Google Lens: open the Google app, tap the Lens camera icon in the search bar, and take or select a photo. Then narrow the selection to the object or text that matters.
In this guide, I’ll walk through the steps for Android, iPhone and desktop. I’ll also explain how I would refine an unclear result, check a product match and use visual search as a starting point for SEO research.
What is Google Lens?
Google Lens is Google’s visual search tool. It lets me begin a search with a camera image, saved photo or screenshot, rather than relying only on typed words.
The results depend on what is in the picture. I might see similar products, pages containing related images, text I can copy or information about a landmark. Google’s Lens overview explains its main capabilities, including translation and homework help.
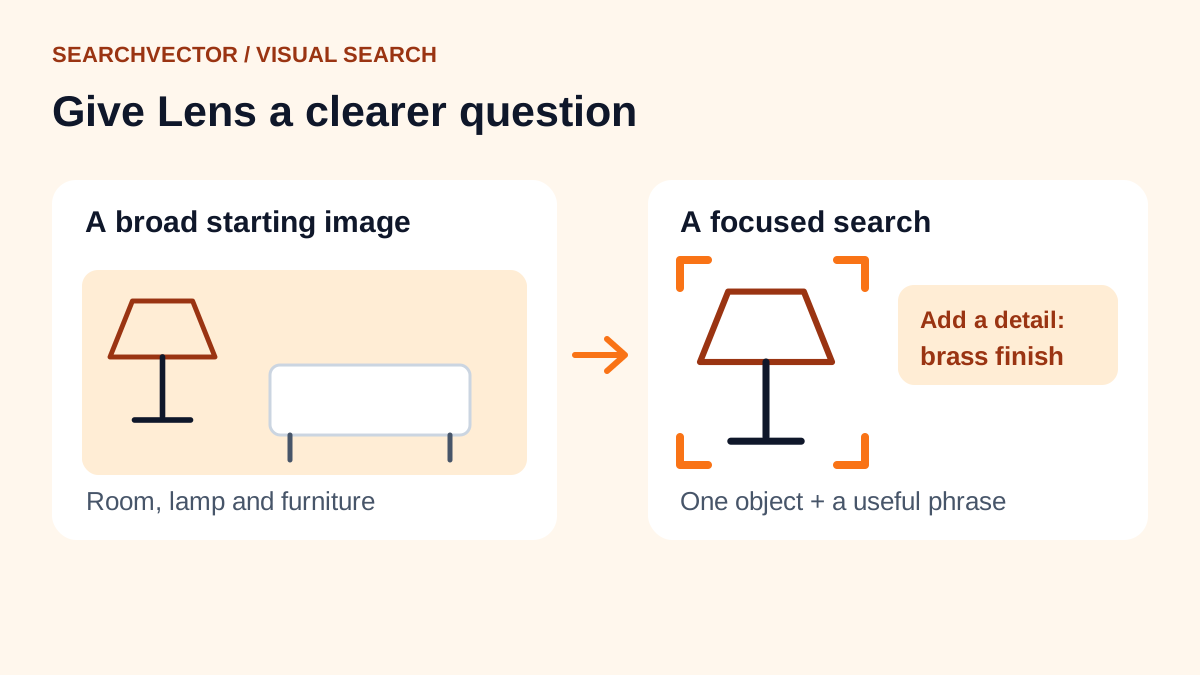
I treat the image as the question’s starting point. If a photo contains a table, chair and lamp, selecting the lamp tells Lens which object I mean. Adding a phrase such as “brass finish” makes the request more specific.
Where should I open Lens?
I choose the entry point based on where the image is:
- For an object in front of me, I use the Google app’s camera option.
- For a picture on my phone, I select it from the photo picker or open it in Google Photos.
- For an image on a desktop webpage, I use Chrome’s Lens option.
- For an image file on my computer, I upload it through Google’s Search by image button.
I don’t need every Google app installed. One suitable entry point is enough to begin.
How I use Google Lens on Android
For Android, I start with the latest version of the Google app. These are the core steps in Google’s Android image-search instructions:
- I open the Google app and tap the Lens icon in the search bar.
- If prompted, I allow camera access to photograph something nearby.
- I point the camera at the subject and tap the search or shutter control.
- I adjust the selection box to focus on the relevant detail.
- I explore the results and open a useful page for more information.
For example, if I wanted to identify a book on a crowded shelf, I would frame its cover rather than the entire shelf. A visible title or author name gives me another detail to compare with the result.
Some Android phones also include Lens in their camera app. I would check for that shortcut, but I wouldn’t assume every manufacturer puts it in the same place.
The Google app is a useful starting point when a camera shortcut is missing. App versions and device settings can change the buttons I see.
How I use Google Lens on iPhone or iPad
On an iPhone, I can start with the Google app. I don’t need to install Google Photos as well unless I want to work from that photo library.
- I open the Google app and tap the Lens icon.
- I allow camera access if I want a new picture.
- I photograph the subject, or use the photo picker to select an existing image.
- I move the selection box around the part I want to search.
- I review the matches and add words if I need a more specific answer.
I follow Google’s iPhone and iPad instructions for the available controls. The photo picker may ask which images the app can access. I can select the relevant photo without assuming access to my entire library is necessary.
If I see a product in a screenshot, I would select that image rather than trying to photograph another screen. The next step is to isolate the product, especially if the screenshot includes captions, menus or several items.
How I search saved photos and screenshots
A live camera view isn’t required. I can work with a picture I already have, including a screenshot saved from an app.
In the Google app, I open Lens and choose the image from the available photos. If the item is small, I select just that area before reading the results.
In Google Photos, I open the picture first, then look for Google Lens. Google’s current Photos instructions place Lens under the More menu; the visible shortcut can vary by version.
For a room screenshot, I would search one piece of furniture at a time. A result for the entire room may be useful for decorating ideas, but it is less focused than a search for one chair.
Before uploading, I also check what else the screenshot contains. A message preview, delivery address or account name may have nothing to do with my search. I would remove those details from the image first.
How I use Google Lens on a computer
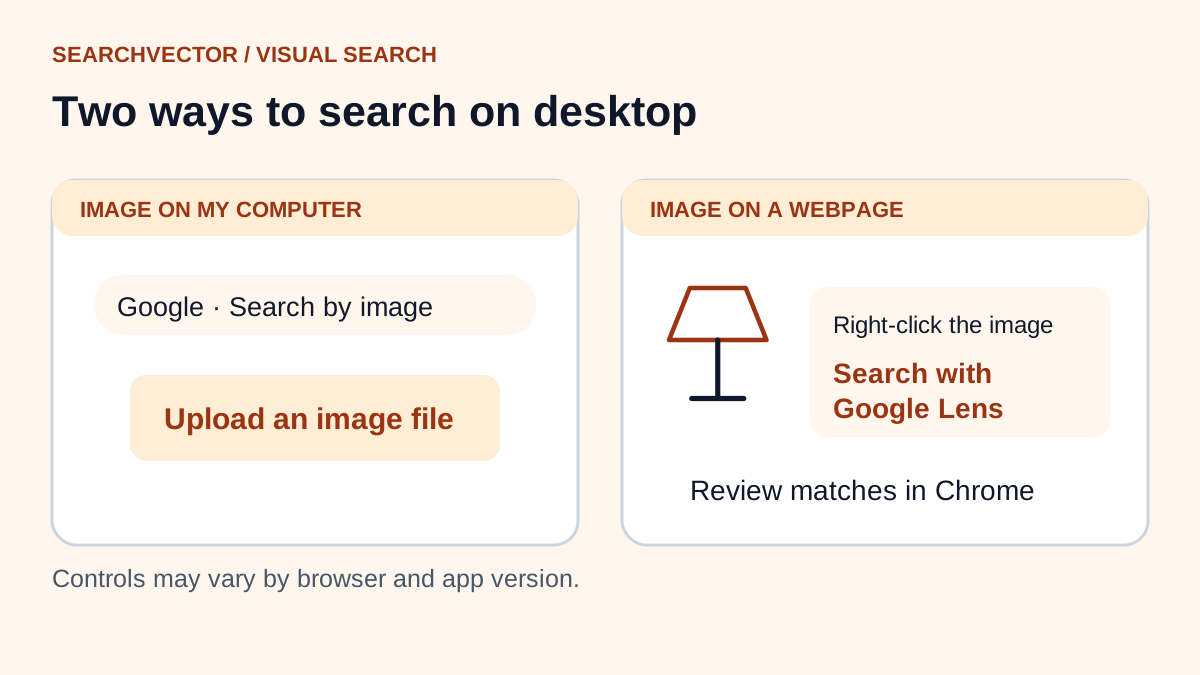
I use one of two desktop routes: upload a local image or search something already visible in Chrome.
Uploading an image file
For a file stored on my computer, I follow Google’s desktop image-search steps:
- I open Google Search in my browser.
- I click the Search by image icon beside the search box.
- I choose Upload a file and select the image.
- I review the results and refine the selected area if needed.
This upload route works in major browsers, including Chrome, Firefox, Safari and Edge. I can also use the image-link option when I have the direct URL of an online image.
Searching a webpage in Chrome
If the image is already on a page, I right-click it and select Search with Google Lens. For a broader page selection, Chrome also offers Search this tab with Google Lens in its menu.
I can then select the relevant content and review results in the side panel. Google’s Chrome guide notes that Google should be the default search engine for this workflow.
I would use this route to investigate a light fitting shown in a property listing, for example. It keeps the original image close by while I compare the shapes and dimensions described on other pages.
What I can do with Google Lens
Once I’ve opened Lens, the useful next action depends on my goal. I avoid treating every image as a general object-identification task.
Find a product or a similar design
For shopping research, I would start with a clear view of the item and inspect the returned matches. A visually similar jacket may have a different fabric, fastening or cut.
I would compare the image against details on the retailer’s page before calling it an exact match. Labels, model numbers and distinctive features are stronger checks than colour alone. I would also confirm the current price and stock with the seller.
If my goal were inspiration rather than identification, a close visual match could be enough. Deciding which outcome I need helps me judge whether the search succeeded.
Copy text without retyping it
Lens can select text from an image. I would open the picture, select the relevant words and use the copy action offered.
For a printed notice, I might copy only the opening hours rather than the whole page. I would check the pasted text against the original, especially where a zero could look like the letter O or a handwritten number is unclear.
The useful outcome is editable text. Before sharing or saving it, I would correct recognition errors and make sure the text belongs in that destination.
Translate a sign or menu
For text in another language, I look for the translation option and choose the target language where prompted. Keeping the writing in focus matters more than including the whole scene.
I would photograph a flat section of a menu rather than a sharply angled page with glare. Google’s image-translation guidance explains that small, unclear or stylised text can reduce accuracy.
A translation can help me understand the general meaning. If one word changes an important decision, I would seek clarification rather than assume the first translation is exact.
Learn about an unfamiliar object or place
I might use a photo to investigate a landmark, painting or plant. Google Photos documents these among the subjects Lens can help explore.
I would look for details that support the identification: a building’s location, an artwork’s signature or a plant’s leaf shape. A broad resemblance is a lead to investigate, rather than proof that the first label is correct.
For an unfamiliar object, a second angle can give me another feature to compare. I would keep the search focused on visible characteristics instead of forcing an early guess into every follow-up question.
Get help understanding a study question
Google lists homework help among Lens’s capabilities. I would frame one question clearly, including the symbols, diagram or instructions needed to understand it.
My aim would be to find an explanation I can follow. I would compare the result with the original question and check whether it interpreted the notation correctly.
A useful follow-up might ask why a particular step works. That gives me something more valuable than copying an answer without understanding how it was reached.
How I make sense of the results
I separate three outcomes when assessing a Lens search: an exact match, a similar image and a possible identification. They answer different questions.
For an exact product search, I would check model details on the destination page. For a design search, I might collect several similar items. For identification, I would look for evidence beyond the visual resemblance.
I also open the page behind a result when the detail matters. A thumbnail alone may hide the context I need, such as whether a listing describes a replica, accessory or discontinued version.
Add a useful follow-up
After the first search, I can add words to explain the question more clearly. Depending on the app, the field may say Ask about this image or Add to your search.
For a photo of a patterned cushion, I might try “outdoor fabric” if that is the feature I need. For a book cover, I might add the author’s name if several editions look alike.
I change one part of the request at a time. If I adjust the crop and add several new conditions together, it becomes harder to tell which change improved the result.
What I check when Google Lens isn’t working
I begin with the point where the process fails. That is more useful than repeating the same search without changing anything.
- If the camera won’t open, I check the Google app’s camera permission in my phone settings.
- If a saved image is missing, I check photo access and whether I selected the correct album or file.
- If results don’t load, I check my connection and try again after updating or reopening the app.
- If the matches are irrelevant, I reduce the selection to one object and try a clearer image.
- If Chrome’s Lens option is missing, I check the browser version and default search engine.
For image quality, I would look for blur, reflections and a subject that is too small in the frame. Moving closer or changing the angle may help more than repeatedly submitting the same picture.
I check permissions in the phone’s settings rather than searching for one universal Lens settings menu. Button names can differ, so I check the app I’m actually using before following a device-specific shortcut.
How I handle privacy and search history
Before searching, I ask whether the picture includes anything I wouldn’t want to submit to an online service. I avoid using private documents when a cropped, non-sensitive detail would answer the question.
Google provides account controls for Lens activity and image storage. Its Lens activity guidance explains how to review activity and manage Visual Search History. That image-history setting is off by default.
I distinguish permission to access a photo from the settings governing activity saved to my account. Reviewing one doesn’t tell me everything about the other. I would check the relevant controls rather than assume a search leaves no account history.
How I would apply visual search to a business website
For a business, I see a Lens search as a way to explore how a product is recognised and described. It can generate useful questions, but one search cannot explain all of a website’s visibility problems.
I would begin with a few representative products. For each one, I would note the image used, the selected area and whether the results show my product page, similar items or unrelated matches.
If my page is missing, I would investigate further. I wouldn’t conclude from that result alone that an image, a schema field or a ranking issue must be responsible.
Check the image and its landing page
Google’s image SEO guidance recommends clear images, descriptive filenames, useful alt text and relevant surrounding content. Alt text describes an image for accessibility and helps provide context; I would keep it accurate rather than pack it with keywords.
I would also check that the destination page clearly describes the product in the photo. A shopper needs enough information to distinguish the exact item from a similar design.
For ecommerce pages, Product structured data can make product information eligible for richer appearances across Google surfaces, including Lens. Eligibility doesn’t promise a particular placement or sale.
Turn visual clues into keyword research
A visual match can suggest words to investigate. A lamp might lead me to a shape, material or style term that my product page barely explains.
I would test those terms with SearchVector’s keyword research tool, then review their relevance to the actual product. A phrase is only useful if it reflects what I sell and what a visitor wants to find.
To expand a useful phrase, I could explore the Google Keyword Suggestions tool. It focuses on keyword ideas; I would keep those ideas separate from my manual Lens observations and validate which ones fit the page.
Make the picture the start of a better search strategy
A visual search can reveal the product detail I didn’t know how to name. My next step would be to turn that clue into a useful page, a relevant keyword or a clearer product description.
Want to move from “what is this?” to “how could customers find it?” Explore SearchVector to connect keyword research, competitor analysis and search-performance work in one SEO platform. Start with one product, investigate the language around it and build from there.
Frequently asked questions
1. Can I use Google Lens for free?
Yes, I can access the basic Lens search experience through Google’s free apps and web search. My usual internet or mobile-data charges may apply, and buying something from a shopping result is a separate transaction.
2. Can I use Google Lens without the internet?
I plan to use an internet connection for Lens searches and online results. If I need translation while travelling, I check the Google Translate app’s separate offline options rather than assume Lens will work offline.
3. Can I find the original source of an image?
I can look for matching pages and use Google’s About this image information where available. It may show earlier appearances, but the earliest page Google finds doesn’t necessarily identify the original creator.
4. Does finding an image mean I can reuse it?
No. I would check the image’s licence or ask the rights holder. Finding a match through Lens doesn’t itself give me permission to publish it on my website or use it in marketing.
5. Can I trust Lens to identify something with certainty?
I treat a result as a suggestion to verify. For an important identification, I compare distinguishing details and seek an appropriate authoritative source. A convincing visual match alone isn’t enough to establish certainty.
6. Is Google Lens the same as Circle to Search?
They offer related visual-search experiences, but I access them differently. On supported Android devices, Circle to Search lets me select content already on my screen without switching apps. Lens also supports camera and saved-image workflows.
7. Do I need a separate Google Lens app?
I can start through the Google app, Google Photos or supported browser workflows, so a separate Lens download isn’t necessary for those routes. I choose the app that already contains the picture or offers the camera access I need.